Blink AMI 1.5.4 Usage Instructions
To successfully deploy Blink AMI, it is recommended that you become familiar with the following AWS Services. If you are completely new to AWS, you will also need to review Getting Started with AWS.
It is also recommended to have basic knowledge of Linux concepts and command line usage.
If you don’t already have an AWS account, you need to create one at https://aws.amazon.com/.
Before deployment you also need to request quota increase for the instance type you plan to use (P or G). To calculate the required quota, get vCPUs number from desired instance specification, then multiply with the number of modem instances you plan to deploy in a region. Note that you need separate quota increase request for each region where you plan to deploy Blink AMI.
If you already have a working VPC containing Ground Station receiver instance you should check that its subnet corresponds to an availability zone which supports P3, P4, G4dn or G5 instance types. Use these instructions to do that. If availability zone supports those GPU instances you can skip to chapter 7.4 otherwise, you will need to recreate Ground Station resources stack in another availability zone before proceeding with Blink AMI deployment.
In order to configure your AWS account to work with AWS Ground Station service and onboard satellites, you need to follow these instructions. When requesting satellite onboarding you should also request onboarding of your own satellites, if any, in addition to onboarding provided direct broadcast satellites.
Note: instructions in sections 1.3.2, 2.1 and 2.2 apply to narrowband digIF processing. If you would like to use wideband digIF processing using AWS Ground Station Agent please contact Blink support at for detailed instructions since this scenario requires customised AWS Ground Station Agent installation and configuration. While you can consult AWS Ground Station Agent User Guide for general guidance note that you should not use those instructions as-is since Blink Modem requires customized AWS Ground Station Agent installation and configuration procedure.
First check which availability zones in your region provide P3, P4, G4dn or G5 instance types following these instructions.
Create VPC and deploy Ground Station resources stack using these instructions. When creating VPC make sure that you select at least one, and preferably two availability zones with GPU instance support. You can use provided AquaSnppJpss-1TerraDigIF.yml template, choose the option to create receiver instance and use a subnet created in an availability zone with GPU instance support.
Take note of cluster placement group resource created as part of stack deployment since you will use this later for Blink AMI deployment.
Before deploying you must subscribe to “Software-Based Satellite Modem - Blink AMI” product on AWS Marketplace using your AWS account. Note the AMI id since you will use it when launching Blink modem EC2 instance.
You can create Blink modem EC2 instance using either AWS management console or AWS CLI. Specify AMI which you subscribed to in chapter 1.4 and make sure that you specify same subnet and placement group as the one associated with Ground Station receiver instance. If you plan to store modem output on the file system, increase default EBS root volume size of 100 GB as required for your use case. You should also specify encrypted EBS volume in that case, especially if your output contains proprietary data.
Security group used for modem instance should only allow incoming traffic to port 22 (SSH) for administration and 1700 (TCP or UDP) for digIF stream and you should also restrict incoming traffic source as applicable in your VPC. TCP is default setting in Blink; but if UDP is needed (as is for wideband scenarios), Blink can be reconfigured to use it instead of TCP. Source for port 1700 should be restricted to the IP address of a receiver instance which will send digIF data stream to modem, while a source for port 22 should be restricted to bastion instance or instances used for SSH access.
Once you created Blink modem instance you must configure Data Defender software on receiver instance to send outgoing digIF stream to modem instance. To do that follow these instructions but set parameters on Local Endpoint screen like this. Note that Local Consumer field value must be set to private IP address of your own modem instance:
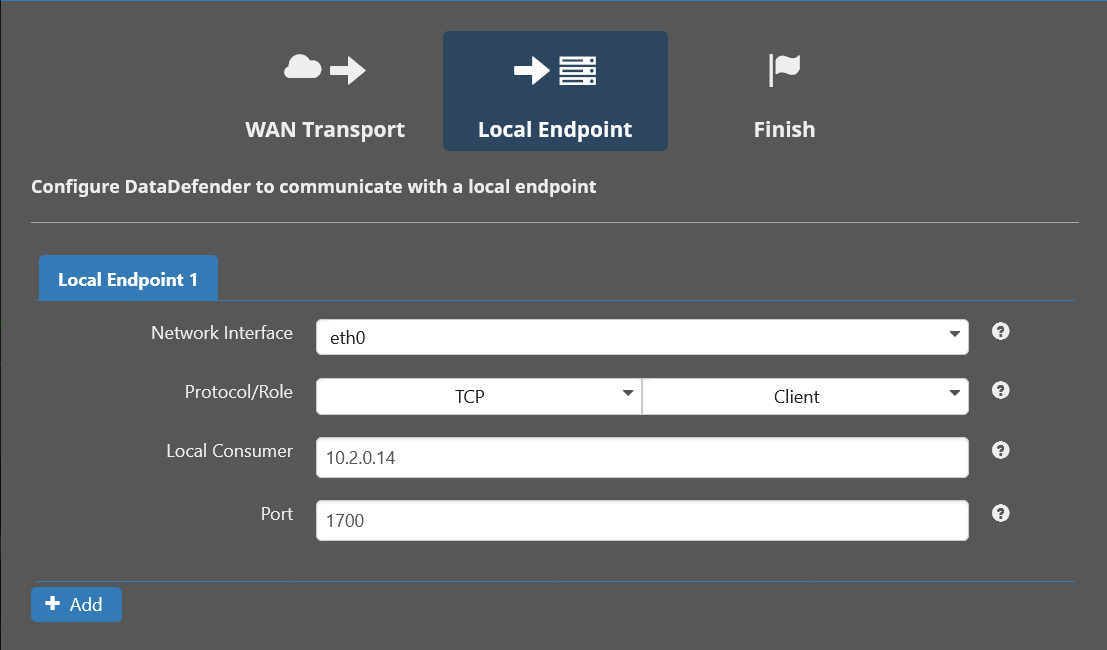
Local Endpoint setup
Blink modem AMI comes with default configuration for Suomi NPP mission (configurations for other missions should be requested by contacting ). As soon as modem instance is fully started this configuration is applied; and the modem will already be in running mode, listening on incoming TCP port 1700 for digIF data to start streaming in from the receiver instance. Make sure you have started the Blink instance at least 3 minutes before nominal Ground Station contact start time to give it enough time to load all services properly.
In case of a default TCP stream between a receiver and a Blink modem there is no need to explicitly stop the processing, modem components will recognize the end of incoming stream (once the receiver disconnects) and shutdown processing on their own. Make sure you've left up to 30 seconds after streaming has ended for final acquisition report to be prepared, before you issue instance shutdown command.
UDP stream
In case of an UDP stream between a receiver and the Blink modem, you need to explicitly stop the processing, as with the UDP the modem components cannot recognize when to stop listening for incoming data. For starters, stopping Blink processing modules can be done manually via its web user interface or via its REST API. Either way, one must first log in to gain access to modem's control functions.
For manual testing purposes, one can simply log into the instance via web interface and execute stop command at contact stop time. For operational use, stopping and shutdown can be automated as well (e.g. with lambda functions responding to Ground Station events) however it usually requires tailoring to a specific setup. Feel free to contact Blink support for more information.
Web interface
Blink modem includes a powerful monitor and control interface which is designed to represent a central point to overview operational status and control modem’s parameters and processing information.
To access modem web interface, there is a prerequisite to first connect to the modem instance using SSH command which enables port forwarding. The actual command will be slightly different depending on the operating system used on the SSH client side.
On Windows:
ssh -L 8090:localhost:80 -o ProxyCommand="C:\Windows\System32\OpenSSH\ssh.exe -o \"ForwardAgent yes\" -W %h:%p -i \"<EC2 private key>\" ec2-user@<bastion host public IP address>" -i "<EC2 private key>" ubuntu@<modem instance private IP address>
On Linux or MacOS:
ssh -L 8090:localhost:80 -o ProxyCommand="ssh -A -o 'ForwardAgent yes' -W %h:%p -i <EC2 private key> ec2-user@<bastion host public IP address>" -i <EC2 private key> ubuntu@<modem instance private IP address>
Once the SSH connection is established, access to Blink web interface is available from the browser using http://localhost:8090 as URL.
To log in, use blink-user/ username and password, where the is the instance ID of your Blink modem instance.
blink-user has basic roles needed to view the modem's dashboard and issue minimum number of required operational commands.
IMPORTANT: To protect access to the modem's interface from unauthorised parties, it is strongly recommended to change the start password after creating own modem instance from Blink AMI. Log in with the password and go to user profile page to change the password to a more secure one.
The best way to perform end-to-end testing with default configuration is to schedule short AWS Ground Station contact with Suomi NPP (minimal contact length of 1 minute will be sufficient) and verify that data pipeline works as expected and modem output gets produced.
The processing overview can be observed via browser, by logging-in to the modem's monitoring and controlling web interface available at instance’s IP address, as described above.
Once logged in, Blink’s web dashboard will display current configuration, processing status, incoming signal characteristics and frequency spectrum, constellation diagram and other, standard-specific processing statistics.
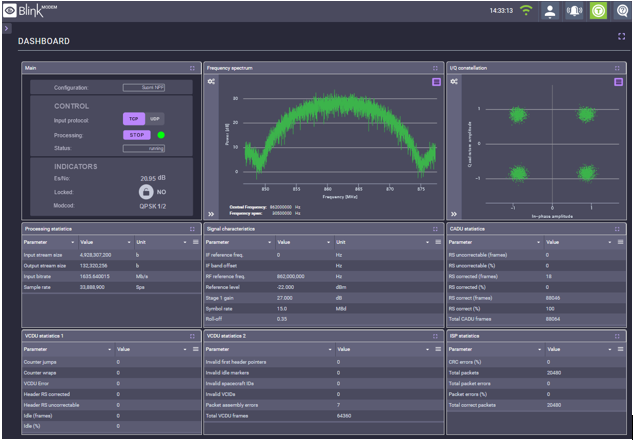
Blink User Interface
For a test with default configuration, a contact for Suomi NPP satellite should be scheduled, and in order to do that these instructions need to be followed. The modem instance should be fully started before the contact start time, same for the receiver instance if it is not being automatically started. At the contact end time, stop command might be needed as described in 2.3. If everything goes fine, once the contact is finished, a subdirectory in /var/blink/out/ directory will be created, containing contact output and report files.
If there is no output at all, it is likely that the digIF stream did not even reach the modem instance, so Data Defender configuration should be checked as described in 2.2.
If there is output but there are excessive errors in the contact report, the content of following log files should be checked:
- /var/log/blink-dsp/dsp-rotating.log
- /var/log/blink/blink-service.log
If it’s not possible to determine the root cause based on the log content, Blink support should be contacted with relevant information. Deployment troubleshooting is included in Basic support offering at no additional cost. Blink support e-mail address is . Please include your AWS Account ID when contacting support.
To troubleshoot issues with SSH access to modem instance, this support article can be followed.